
Empowering Data Ownership: Deploying a Decentralized Data Brokerage Marketplace with Scroll and SpruceID


The Data Dilemma
$641.4 billion is the estimated size of the data brokerage industry by 2027. It's only projected to grow more each year with a projected compound annual growth rate (CAGR) of 13.2% (Statista). With this ever-increasing size of the data brokerage industry, and more ways in which user is data is being monetized, the urgency to address questions of ownership and control of personal information has never been more critical. In a world driven by data, the symbiotic relationship between data brokerage, emerging technologies like blockchain, and the pursuit of data sovereignty becomes increasingly evident in this ever-expanding market. The data brokerage industry- a formidable force in the digital landscape, has ignited concerns over privacy, prompting the need for decentralized solutions. The digital age has ushered in an era where individuals strive to take command of their data amidst the dominance of centralized systems. This article serves as a comprehensive resource to guide you in creating a decentralized data marketplace, leveraging the Hardhat, Scroll, and SpruceID. Here's the GitHub repo that you can use as a resource to follow along: TechieTeee/DataMine: Decentralized Data Marketplace (github.com)
What's Scroll? What's SpruceID? What's Hardhat? What's Remix?
Introduction to Scroll, SpruceID, Hardhat and Remix
Let's dig into our tools- Scroll, SpruceID, Hardhat and Remix. Building secure and efficient data marketplaces on the blockchain might seem daunting but fear not! Powerful tools like Scroll, SpruceID, Hardhat, and Remix IDE are here to help. Scroll, a Layer 2 solution for Ethereum, significantly reduces transaction fees and speeds up processing, making it ideal for frequent data transactions. SpruceID empowers users to manage their digital identities securely, ensuring trust and transparency in data ownership. Hardhat simplifies smart contract deployment to Scroll and other compatible blockchains like Ethereum. Finally, Remix IDE offers a user-friendly online platform for testing and deploying smart contracts. Within this tutorial, we explore it as an alternative deployment option for newer web 3 developers. Together, these tools offer a powerful combination of speed, security, and ease of use, paving the way for a new era of accessible and trustworthy data marketplaces.
Getting Hot and Heavy with Hardhat
Getting Started with the Hardhat Lock Template
To kick off our journey, let's set up a new project using the Hardhat Lock template. This template provides a solid foundation for creating a decentralized data marketplace. Please fill free to use your local or online IDE of choice. Some great options like IntelliJ, Gitpod or Visual Studio Code are great platforms to explore. Use what you're most comfortable with. Now, we're going install Hardhat and then create a sample project. Please run these following commands in your command line.
npm install --save-dev hardhat
npx hardhat init

Hardhat will give you the option of TS or JS. To follow along with this tutorial, please chose the JavaScript option. Follow through with remainder project creation questions from Hardhat and choose your root project directory. By default, Hardhat chooses the directory, where you have run the commands. If this is where you want your project to be located, please confirm it in the terminal dialogue. Also, don't forget to say yes to the .gitignore file, so you can have a secure place to store important information for the project later. Voila! Now, you have created your first template, Hardhat project. Now, we need to mold this into our data marketplace.
Integrating SpruceID: Empowering Decentralized Identity Verification
For this purpose of this tutorial, the integration of SpruceID will be implemented into the smart contract logic to verify that the user is authenticated through SpruceID. This integration allows user authentication through SpruceID. Before developing the smart contract, we need to install SpruceID and the relevant dependencies that go along with it. For this initial version of the project, it will be important for the function of the smart contract. If you decide to explore this project further, beyond the scope of this tutorial, and make a full stack dapp, it will be important for integration into frontend logic to work with Metamask or other login approaches and additional background logic. Execute the following commands to secure the necessary tools for this integration:
cargo install didkit-cli
npm i @spruceid/rebase-client
Now, you have the required dependencies for this version of the smart contract as well as future iterations, if you decide to take the project further.
Transforming Lock to DataMine
The stater project includes a starter smart contract called Lock.sol. You can find this located in the contracts folder. Through step-by-step modifications, we'll transform Lock into DataMine, our decentralized data marketplace smart contract. Before making any change to this code, let's better understand its core functionalities. Its primary purpose is to enable the locking of Ethereum funds for a designated period, liberating them only when specific conditions are met. Check out the explanation of some of the key functions below, as well as the starter smart contract Lock.sol.
lockFunds(uint256 unlockTimestamp): Initiates the locking process, specifying the unlock timestamp for when the funds become accessible.withdraw(): Enables users to retrieve locked funds, subject to the condition that the unlock timestamp has been reached.cancelLock(): Provides a mechanism to cancel the fund-locking process, returning funds to the user.
Lock Smart Contract Code
// SPDX-License-Identifier: UNLICENSED
pragma solidity ^0.8.9;

// Uncomment this line to use console.log
// import "hardhat/console.sol";

contract Lock {
    uint public unlockTime;
    address payable public owner;

    event Withdrawal(uint amount, uint when);

    constructor(uint _unlockTime) payable {
        require(
            block.timestamp < _unlockTime,
            "Unlock time should be in the future"
        );

        unlockTime = _unlockTime;
        owner = payable(msg.sender);
    }

    function withdraw() public {
        // Uncomment this line, and the import of "hardhat/console.sol", to print a log in your terminal
        // console.log("Unlock time is %o and block timestamp is %o", unlockTime, block.timestamp);

        require(block.timestamp >= unlockTime, "You can't withdraw yet");
        require(msg.sender == owner, "You aren't the owner");

        emit Withdrawal(address(this).balance, block.timestamp);

        owner.transfer(address(this).balance);
    }
}
Now, we're going to transform this into the primary smart contract that we will use for the data marketplace. First, remove all of the contents of the Lock.sol file until you have a blank file. Then rename the file for the name of our smart contract to DataMine.sol, now we're going to fill the empty file with the code for our new smart contract. Please check out an explanation of each of the functions of our new smart contract, as well as the code for the smart contract below.
listData(string memory dataHash, uint256 price): Initiates the listing process, allowing users to put their data up for sale. This function records essential details such as the data hash and the specified price.buyData(uint256 id): Facilitates the purchase of listed data items. Users can acquire data by specifying the unique identifier (id) associated with the desired data listing and providing the necessary payment.cancelListing(uint256 id): Empowers sellers to cancel a data listing, ensuring flexibility in managing their offered data.searchData(string memory dataHash) returns (DataItem[] memory): Enhances user experience by enabling the search for specific data items based on their unique data hash.withdraw(): Allows sellers to withdraw the proceeds from the sale of their data, ensuring a seamless and secure transfer of funds.
DataMine Smart Contract Code
// SPDX-License-Identifier: MIT
pragma solidity ^0.8.0;


contract DataMine {
    // Data Structure
    struct DataItem {
        address seller;
        string dataHash; // Store a hash of the data for verification
        uint256 price;
        bool available;
    }

    // Mapping to store data items
    mapping(uint256 => DataItem) public dataItems;

    // Unique ID counter for data items
    uint256 public nextId;

    // Mapping to store user authentication status
    mapping(address => bool) public authenticatedUsers;

    // Event to notify when a user is authenticated
    event UserAuthenticated(address user);

    // Modifier to ensure that the user is authenticated through SpruceID
    modifier onlyAuthenticated() {
        require(authenticatedUsers[msg.sender], "User not authenticated through SpruceID");
        _;
    }

    // Function to authenticate user through SpruceID
    function authenticateUser() external {
        // Add SpruceID authentication logic here
        // Ensure that only valid users are marked as authenticated
        // You may call a function on the SpruceID contract for verification

        authenticatedUsers[msg.sender] = true;
        emit UserAuthenticated(msg.sender);
    }

    // Function to list data for sale (only authenticated users)
    function listData(string memory dataHash, uint256 price) public onlyAuthenticated {
        require(price > 0, "Price must be greater than zero");
        dataItems[nextId] = DataItem(msg.sender, dataHash, price, true);
        nextId++;
    }

    // Function to buy data (only authenticated users)
    function buyData(uint256 id) public payable onlyAuthenticated {
        require(dataItems[id].available, "Data item is not available");
        require(msg.value >= dataItems[id].price, "Insufficient funds");

        // Transfer payment to seller (modify according to token usage)
        address payable seller = payable(dataItems[id].seller);
        seller.transfer(msg.value);

        // Mark data item as sold
        dataItems[id].available = false;

    }

    // Function to cancel listing (by seller and only authenticated users)
    function cancelListing(uint256 id) public onlyAuthenticated {
        require(dataItems[id].seller == msg.sender, "Only seller can cancel");
        dataItems[id].available = false;
    }

    // Function to view listed data items
    function viewListedData() public view returns (DataItem[] memory) {
        DataItem[] memory listedData = new DataItem[](nextId);
        for (uint256 i = 0; i < nextId; i++) {
            listedData[i] = dataItems[i];
        }
        return listedData;
    }

    // Function to search data by data type (dataHash)
    function searchData(string memory dataHash) public view returns (DataItem[] memory) {
        uint256 count = 0;
        for (uint256 i = 0; i < nextId; i++) {
            if (keccak256(bytes(dataItems[i].dataHash)) == keccak256(bytes(dataHash))) {
                count++;
            }
        }

        DataItem[] memory searchDataResult = new DataItem[](count);
        count = 0;

        for (uint256 i = 0; i < nextId; i++) {
            if (keccak256(bytes(dataItems[i].dataHash)) == keccak256(bytes(dataHash))) {
                searchDataResult[count] = dataItems[i];
                count++;
            }
        }

        return searchDataResult;
    }
}
Deploying to Scroll
Deploying via Hardhat
Now, let's deploy the DataMine smart contract using Hardhat. There are three important files for deploying from Hardhat - deploy.js and hardhat.config.js. You can find these files in the scripts and root folder respectively. These files are what equip the smart contract to be deployed to our target chain -Scroll. We need to make some changes in the starter project, so we can deploy the DataMine smart contract. For the deploy.js file, and simplicity's sake, the most important change is to change every instance of Lock into DataMine. After these changes, the deploy.js file should look like the following code.
const hre = require("hardhat");

async function main() {
  const currentTimestampInSeconds = Math.round(Date.now() / 1000);
  const unlockTime = currentTimestampInSeconds + 60;

  const lockedAmount = hre.ethers.parseEther("0.001");

  // Replace "Lock" with "DataMine" in the deployContract function
  const dataMine = await hre.ethers.deployContract("DataMine", [unlockTime], {
    value: lockedAmount,
  });

  await dataMine.waitForDeployment();

  console.log(
    `DataMine with ${ethers.utils.formatEther(
      lockedAmount
    )}ETH and unlock timestamp ${unlockTime} deployed to ${dataMine.address}`
  );
}

// We recommend this pattern to be able to use async/await everywhere
// and properly handle errors.
main().catch((error) => {
  console.error(error);
  process.exitCode = 1;
});
Now, we need to update the hardhat.config.js file, so we can deploy to Scroll. Please update the hardhat.config.js file accordingly and replace the original contents.
require("@nomiclabs/hardhat-waffle");
require("@nomiclabs/hardhat-ethers");
require("@nomicfoundation/hardhat-web3");
require("@nomicfoundation/hardhat-etherscan");
require("@nomicfoundation/hardhat-toolbox");
require("dotenv").config();

module.exports = {
  solidity: "0.8.19",
  networks: {
    hardhat: {},
    ropsten: {
      url: `https://ropsten.infura.io/v3/${process.env.INFURA_API_KEY}`,
      accounts: [process.env.PRIVATE_KEY],
    },
    mainnet: {
      url: `https://mainnet.infura.io/v3/${process.env.INFURA_API_KEY}`,
      accounts: [process.env.PRIVATE_KEY],
    },
    scrollSepolia: {
      url: "https://rpc.sepolia.scroll.network",
      accounts: [process.env.PRIVATE_KEY],
    },
  },
  etherscan: {
    apiKey: process.env.ETHERSCAN_API_KEY,
  },
};
Woo-hoo!!! Almost there, let's keep going. Now, this is one of the most important parts of the tutorial that allows us to deploy to Scroll. We need to update the .env file with our private key, Infura API key and our Etherscan API key. Storing it in the .env file is important because it allows us to use the information for the project and not share it publicly in GitHub or other places, where you want to share the code. If you're unsure how to obtain these keys, please check out these links. Quick reminder- never ever share these private keys with anyone!
How to create a new Infura API key – Infura
How to export an account's private key – MetaMask
Etherscan Information Center | API Keys
Now, we can deploy from Hardhat - yay!!
Ok, so now that we have updated all the files we need. Before we deploy, we need to make sure that we have Scroll Sepolia in our wallets. If you don't already, please check out these test net faucets.
We're all filled up on testnet tokens, so now we can deploy. Go to the root of your project and run these following commands in the terminal. Also, if you haven't added the Sepolia Scroll test net to your wallet, please make sure to do this as well. If you need help with adding the network, please check out the Scroll documentation, which describes the process in detail Setup | Scroll DocumentationThis will compile your project. and deploy it to Scroll.
npx hardhat compile
npx hardhat deploy
After a successful deployment, you should see the information about the deployment appear in the terminal- such as transaction hash, block hash and the contract address.
Remix Option for Quick Deployment
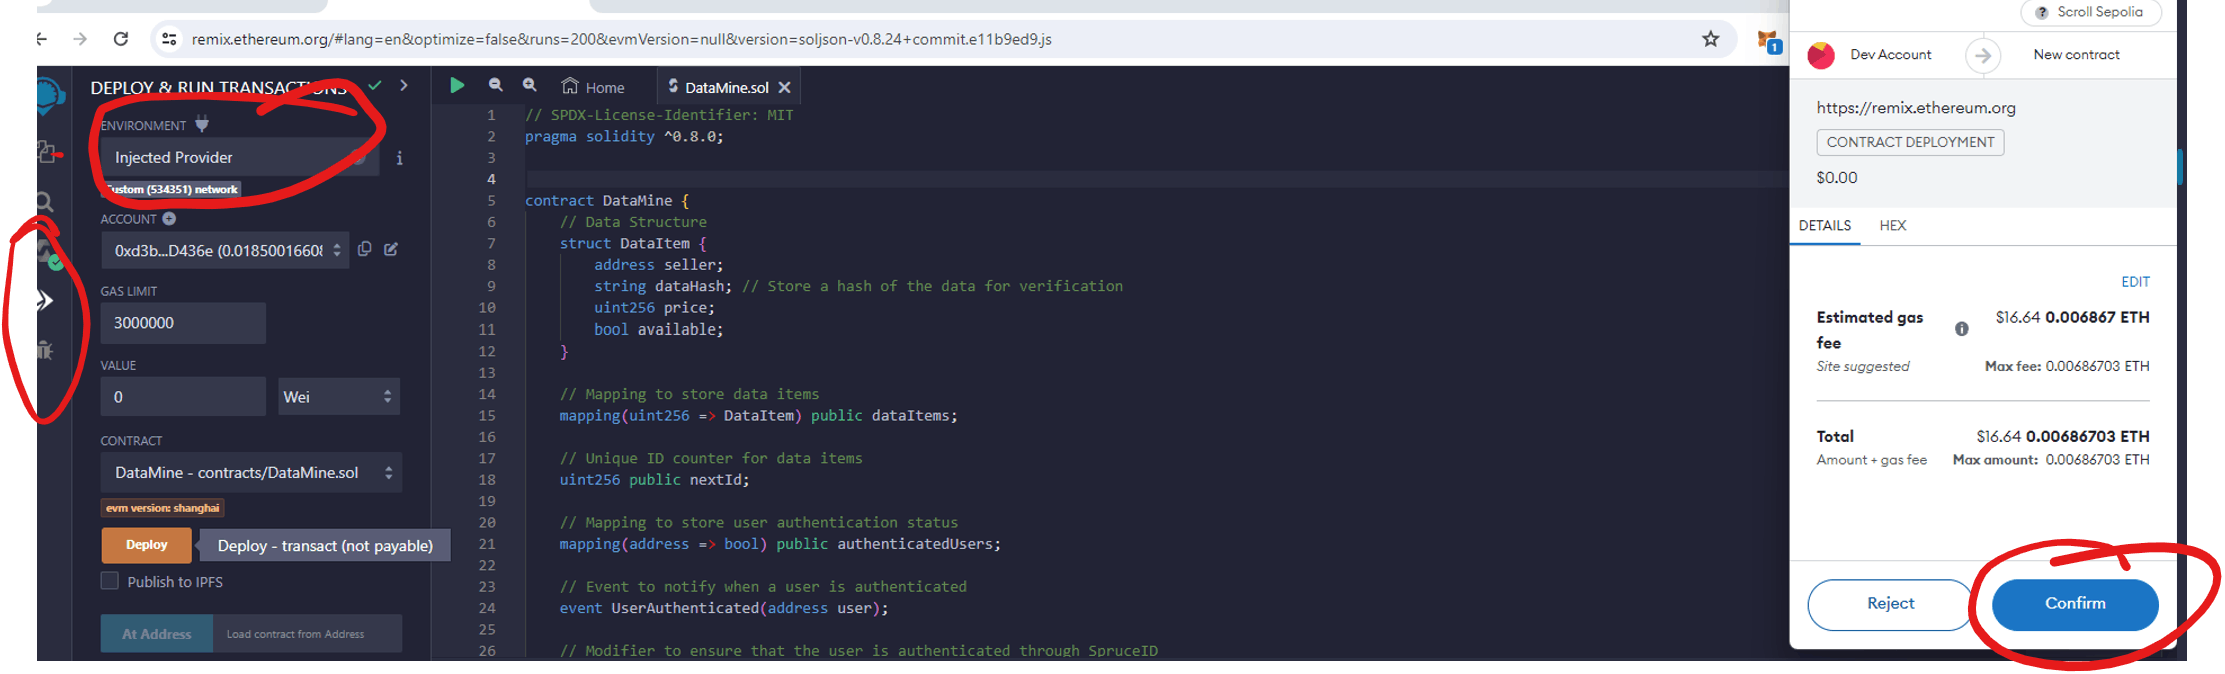
Ok, so what if you're super new to web 3 or you want a quicker and simpler way to deploy the smart contract? Don't worry, I've got you. For quicker deployment, you can take the smart contract code for the DataMine contract and quickly deploy the code through Remix. Once you're in your Remix workspace, simply make a new contract - DataMine.sol. Paste in the code for the contract from the tutorial. Compile the contract from the Solidity Compiler button on left side menu. Then, choose the deploy and run transaction located below it. From the environment button, make sure to choose the injected provider option. This will allow you to deploy from Metamask. If you're Metamask wallet isn't already on the Scroll Sepolia testnet, make sure to switch to it (and also make sure you have test net tokens). Now, click the deploy button. Voila! You just deployed the smart contract to Scroll test net. With a successful deployment, the deployment details will appear in the terminal. Once your instance of the contract it deployed, you should be able to go to the address of the contract on the Ethereum explorer and see it on chain. Check out the image below for example deployment details that are generated, as well where to find the side menu and important buttons and also deployment illustration with Metamask. The side menu, pull down menu for the injected provider and the pop-up message from Metamask to confirm the transaction to deploy the contract are all circled.
Where to Find Important Remix Buttons and Deployment with Metamask
Deployment Details

The Future of Data Sovereignty
Congratulations! You just developed your own decentralized data brokerage marketplace with Scroll, SpruceID and Hardhat or Remix. You're now a part of the revolution of decentralized data. Decentralized data and data brokerage is only going to become more important in the future, as well as these tools that are used to build it. In summary, our journey from the Lock template to the creation of the DataMine smart contract has unveiled deployment options, and the broader implications of decentralized data ownership. The integration of Scroll and SpruceID serves as a testament to the transformative potential of blockchain technologies in reshaping the data brokerage landscape. As we conclude, I encourage you to dive into the provided code, experiment with the projects, and engage in discussions, joining the community of developers committed to advancing decentralized solutions and empowering individuals in their quest for data sovereignty. Stay curious and keep hacking!