How to Write a Smart Contract with TypeScript + Solidity

I'm a data engineer and blockchain developer, who is passionate about changing the world with technology that matters.
Benefits of TypeScript
Over the past year, TypeScript has been gaining ground over JavaScript as the leading language to be used with Solidity for developing smart contracts. One of the biggest strengths of TypeScript is that it's better for testing and QA control of smart contracts. Here's a list of a few, key benefits of TypeScript:
Highlights Errors While Being Written
More Adapted to Testing and Quality Control
Easier to Read and Organize
Classes Can Be Easily Defined
**# Let's Get To It! ** For this tutorial, we're going to use the tool Hardhat and IntelliJ IDE by Jet Brains. There are multiple IDE tools that can be used to compile Solidity and TypeScript, but my favorite is IntelliJ by Jet Brains. There is a free version of IntelliJ and a downloadable plugin for Solidity. Some other popular, free options are VS Code or Atom.
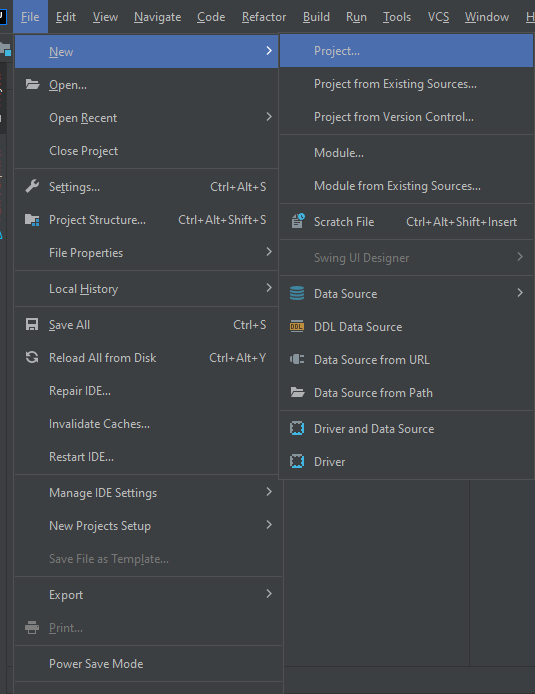
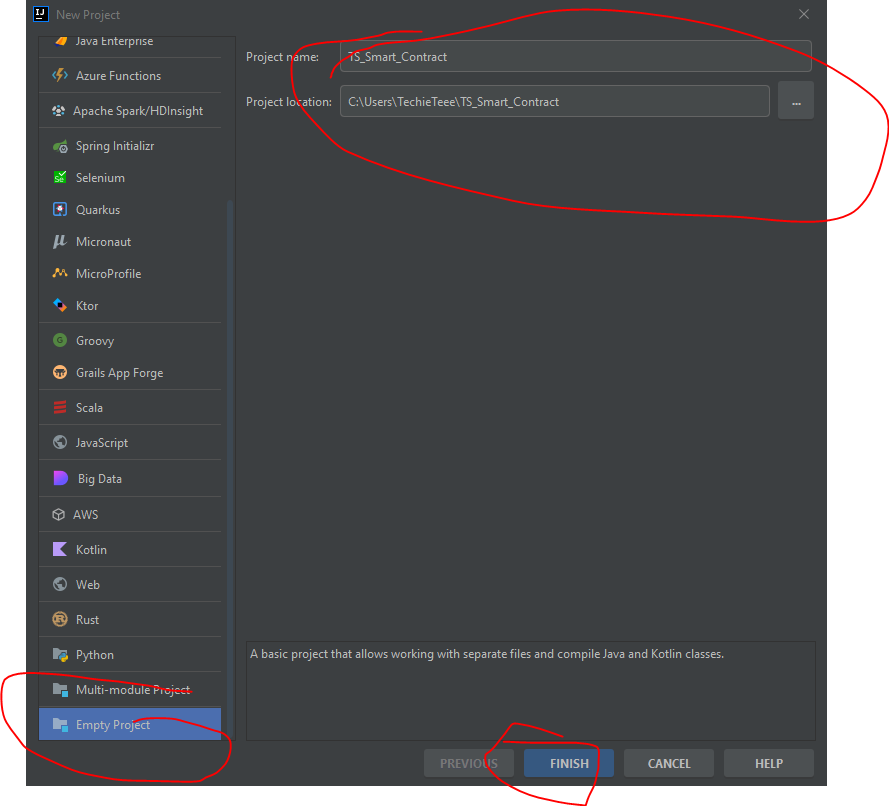
Step 1. Download IntelliJ by Jet Brains
Go to the Jet Brains website and download the version of the app for your appropriate operating system, and follow along with the prompts after it downloads. Then start a new project, and feel free to name it whatever you want. Choose an "Empty Project", so you start with a nice clean canvas.
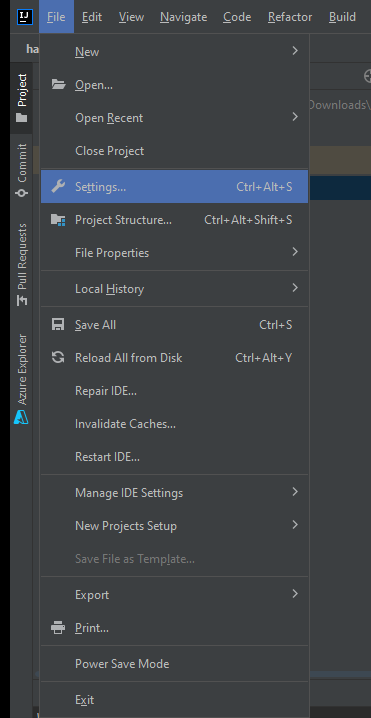
Step 2. Add the Solidity plugin.
Fire up the IntelliJ IDE, and then choose "File" and then "Settings".
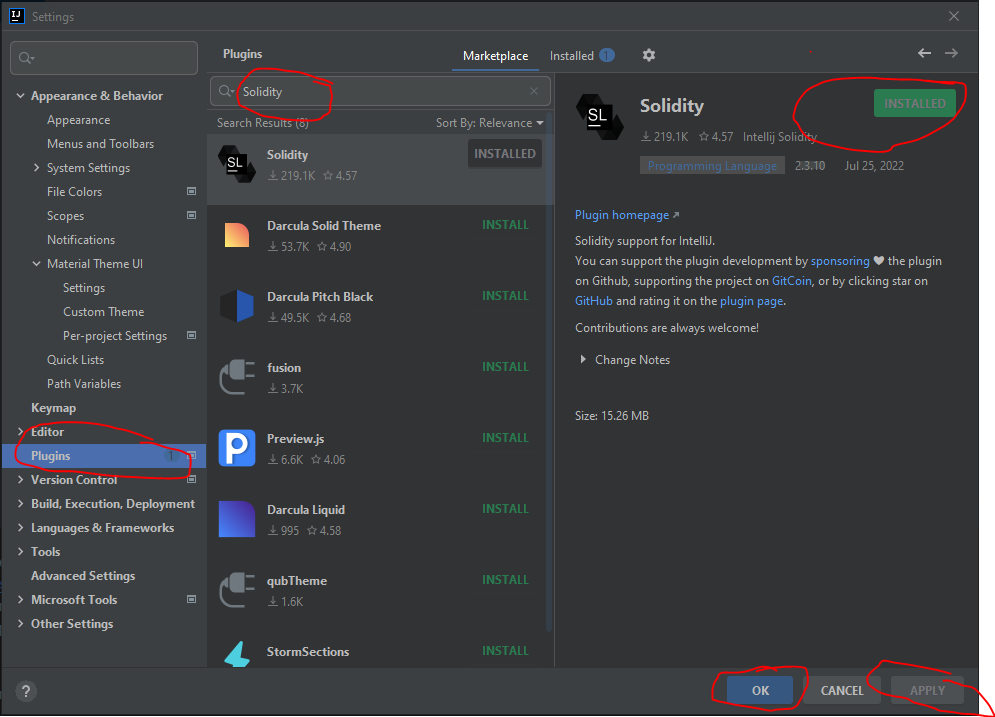
Once you're in settings, navigate to "Plugins" and then type in "Solidity" for the plugin. Then, choose the green "Download" button to add, and then press the "Ok" and "Apply" buttons. You will probably be asked to restart IntelliJ so the plugin can take effect.
Step 3. Download Hardhat
To make our lives easier, we're going to add another tool - Hardhat, which is very popular among web 3 developers because it takes care of setting up the basic project structure for us. Hardhat has to be installed locally into the project. We're going to do this from the terminal within IntelliJ. Use the following commands to install Hardhat locally, as well as the dependencies needed for TypeScript.
This initializes an npm project.
npm init
This installs Hardhat. npm install --save-dev hardhat
Step 4.
Create Hardhat Project. ** Now we need to create the Hardhat project. This will create the project structure with default directories and files we will need for creating and deploying the smart contract.
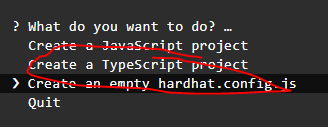
npx hardhat
When the options appear, choose the "Create TypeScript" project.
Step 5. Enable TypeScript features.
We have the skeleton for the project now, and the scripts are written in TypeScript, but depending on the version of Hardhat you install you may still need to still enable TypeScript features manually. So just to be safe, let's run the commands to enable the TS features.
npm install --save-dev ts-node typescript
This enables TS features.
Let's go ahead and enable testing too if you want to explore testing in TS after the tutorial.
npm install --save-dev chai @types/node @types/mocha @types/chai
Well, you have all the files you need now, and the next part will be dealing with the smart contract, Metamask, and deployment to your choice protocol. This tutorial is getting kind of long, let's break this into two parts and continue this later. Stay tuned!
Part 2: Bringing it All Together
Welcome back! In the first part of this tutorial, we set up our development environment using IntelliJ by Jet Brains, integrated the Solidity plugin, and initiated a Hardhat project with TypeScript support. Now, let's delve into the actual development process for our smart contract.
Step 6. Develop the Smart Contract
Open the project in IntelliJ, and you'll find the basic structure set up by Hardhat. Navigate to the contracts directory, and you'll see a sample contract named MyToken.sol. Feel free to modify this contract or create a new one based on your project requirements.
Here's a simple example:
typescriptCopy code// MySmartContract.sol
// SPDX-License-Identifier: MIT
pragma solidity ^0.8.0;

contract MySmartContract {
    uint256 public myValue;

    constructor() {
        myValue = 42;
    }

    function setMyValue(uint256 newValue) public {
        myValue = newValue;
    }
}
Step 7. Compile and Deploy
Now, let's compile and deploy our smart contract. Open the terminal in IntelliJ and run the following commands:
hardhat compile
npx hardhat run scripts/deploy.ts
The deployment script (deploy.ts) is where you specify how your smart contract gets deployed. You can customize this script based on your needs.
Step 8. Interact with the Smart Contract
Once deployed, you can interact with your smart contract through a front-end application, scripts, or directly through the Hardhat console. In your TypeScript files or scripts, you can use the generated TypeScript artifacts to interact with your smart contract in a type-safe manner.
Step 9. Testing
As mentioned earlier, TypeScript is well-suited for testing, providing a strong typing system. You can write tests for your smart contract by creating test files in the test directory.
typescriptCopy code// MySmartContract.test.ts
import { ethers } from "hardhat";
import { expect } from "chai";

describe("MySmartContract", function () {
    it("Should set myValue to a new value", async function () {
        const MySmartContract = await ethers.getContractFactory("MySmartContract");
        const mySmartContract = await MySmartContract.deploy();

        await mySmartContract.deployed();
        await mySmartContract.setMyValue(100);

        expect(await mySmartContract.myValue()).to.equal(100);
    });
});
Run your tests using:
hardhat test
Congratulations! You've successfully set up a Solidity project using TypeScript, compiled and deployed a smart contract, and even written tests for it. TypeScript's benefits, such as error highlighting, readability, and class support, enhance the development and testing process.
Conclusion
In this two-part tutorial, we covered the benefits of TypeScript in Solidity development, set up a development environment using IntelliJ and Hardhat, developed a simple smart contract, and explored testing in TypeScript. Armed with these skills, you're well-prepared to embark on more complex blockchain projects. Happy coding!


